
Users with 'Administrator' and 'Teacher' roles are able to create exams.
Step 1
After logging-in into your environment, open the ‘Administration’ panel on the portal.
Step 2
Select the type of exam that you’d like to create: Classroom, Record & Review or Live Proctoring.
Step 3
- Exam Name: Name of the exam or test.
- First Start Time: The time from which the access to the exam becomes open. From that time, candidates can start their setup.
- Last Start Time: This is the time from which the access to the exam is closed.
ProctorExam recommends at least 30 minutes between First and Last start time. - Duration (in minutes): (Optional) Duration of the exam. For Live Proctoring exams, the duration is used to determine the reserved time slots for pre-assigned proctors. If the “Use Duration” toggle is switched on, the test taker will see a timer on the exam page and receive an alert when the time is almost up (’5 minutes’, ‘1 minute’ then ‘time’s up'). The test taker will not be excluded from the test if the counter reaches 0, but the Reviewers will mark this as suspicious behaviour.
- Include mobile camera?: This option allows a second camera (mobile phone camera) to be used. The students will be required to download the ProctorExam app. We strongly recommend using this option for maximum security.
- Students upload exam?: Set this option to 'YES' if the students need to upload exam document(s) on ProctorExam. If exams are to be saved/uploaded on an external site or program, then you should set this option to 'NO'.
-
Once done, click on "Next step".
Step 4
In the 'Instructions for reviewers' panel, you will fill out the information that will be presented to candidates and also be used by reviewers and/or proctors to adequately monitor the session.
That information is with regards to what is allowed and not allowed during the test.
You can, for example, decide if test takers can visit external pages and/or use an external application. If allowed, then please specify what external websites and applications the students can use.

That information is with regards to what is allowed and not allowed during the test.
You can, for example, decide if test takers can visit external pages and/or use an external application. If allowed, then please specify what external websites and applications the students can use.
Additional materials such as books, pen and paper or a calculator can also be defined as 'allowed materials'.
If you select any of these options, the candidate will be requested to present them on screen before starting the test.
Once completed, click on "Next step".
If you select any of these options, the candidate will be requested to present them on screen before starting the test.
Once completed, click on "Next step".
Step 5
In the Instructions for students, you will define the instructions that will be shown to test takers in order to perform their test.
You can include log-in credentials and the link towards an external test platform, upload documents to be used by test takers during their exam or use the iFrame option offered by ProctorExam for a seamless experience.
Once filled out, click on "Next step" to move to the Students panel.


You can include log-in credentials and the link towards an external test platform, upload documents to be used by test takers during their exam or use the iFrame option offered by ProctorExam for a seamless experience.
Once filled out, click on "Next step" to move to the Students panel.
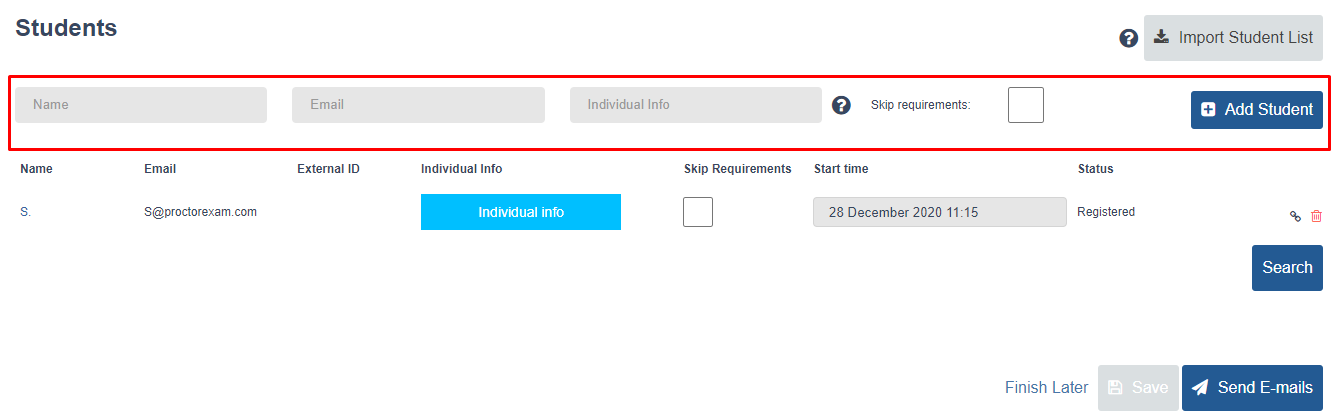
Step 6
Inviting candidates can be done right after setting up a test session or later on, as candidates registrations are confirmed.
- Registration can be done one by one, by using the individual fields available:
- Or in bulk, by importing a CSV file:
Step 7
Select ‘Send emails’ for the candidates to receive an email with the relevant exam details and to start the testing procedure.
At any time, you can come back to this panel, add more candidates and send individual invitations.
At any time, you can come back to this panel, add more candidates and send individual invitations.
Comments
0 comments
Please sign in to leave a comment.